Saturday, 31 October 2015

Happy Halloween!

Hello friends

Woooo - that's my ghostly greeting for today!
No, not very scary but happy Halloween to you all.

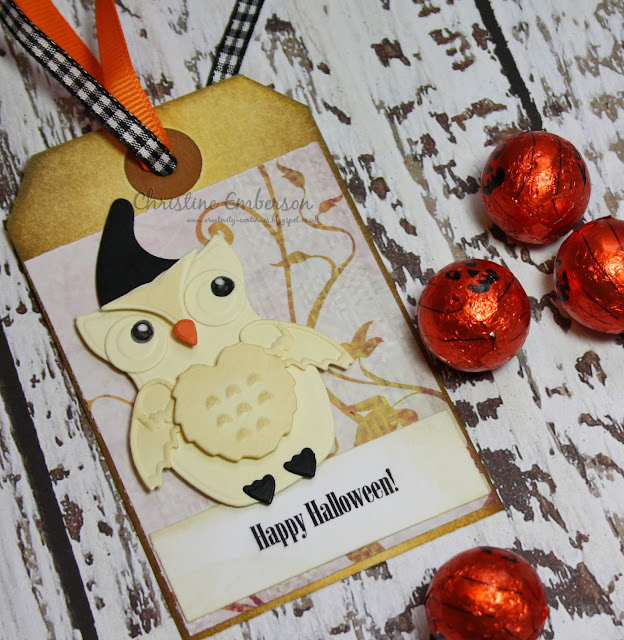
I'm back today with a tag - I just can't resist making these.
My Halloween tag is still focusing on cuteness and simply
created with Woodland Owl -
(this owl and I are becoming good friends).
The backing paper is Arcadia and the font is typed and printed.  

 
Here's a closer look at him...do you like his witches hat?


It's actually from the Mushrooms die set!
 
I chose to tie my tag onto a jar full of chocolate pumpkins -
I don't think these are going to be around for too long!


Both dies mentioned - Woodland Owl and Mushrooms
are available on the website, just click on the die names.

I also understand that boy of mine has now received the Lawn Fawn
goodies - they can be viewed here.
I've nabbed a set of Winter Scripty Sayings - can't wait to use those.

I'm spending this evening in Milton Keynes at
at Halloween get-together...some scary photos may be coming!

Take care friends - I'm back soon.
 

Friday, 30 October 2015

Friday Die Day

Hello friends
 
So this Friday definitely came around super-quick!
I was thinking of looking up how many Fridays until Christmas
but I don't want to panic myself!
 
So back on topic - this week's Friday Die Days is...
 

This die set contains 5 dies with very useful phrases in assorted fonts. 
Approximate Sizes:
Height: ranges from ⅝ to ⅞” Width: ranges from ¼ to ⅞”
This is how they look cut/embossed.
 

 This week a card (having a tag-break!)
 
I've attached a strip of dotted paper to cream card and placed
A2 Matting Basics B #7 (#1 is the smallest die in the set)
to create a matting. Cut/embossed.
 
 
I then cut a black mat with A2 Matting Basics A #7
and placed these onto a cream card base.
 
My additional die cuts are Blooms One, Standard Circles LG
and 'Thank You' is from today's featured FDD - Phrase Set Two.
You can see I've cut a dotted circle in half and placed over the top of a cream one.
 
 
Before I added the die cuts I chose to emboss only with
Standard Circles LG - you can see the embossed line around
the circle edge.
Assembling my card - dots before my eyes at this point!


The finished card with much better lighting!
 

Now if I remove that flower and gemstone 
I may have achieved a card suitable for a man!

 
Phrase Set Two is available on the website here
and don't forget to take a look at Phrase Set One - great ones there too!
 
Tomorrow I will be demoing at Loobi Crafts in Leighton Buzzard,
it's the shop's 10th Birthday celebrations - details are here.
If you live that way it would be lovely to see you.
 
Take care friends, have a good weekend.
 

Thursday, 29 October 2015

Spooky!

Hello friends

It's Halloween Eve-Eve!

 I have to confess I'm not a big fan of Halloween so when I decided to
make a card I still went down the cute road - 
albeit a black owl with spooky eyes!

I rummaged in my box and found some Tim Holtz papers and edged 
these with black photo corners and mounted onto a kraft card.

I then chose Victorian Picket Fence, Wreath, Sprigs
and Woodland Owl as my die cuts.
Amazing how different they look cut from black cardstock.


 I dotted the Woodland Owl's eyes with a white gel pen.


The sentiment is typed and printed onto orange cardstock.
The font is Chiller (appropriately named!)


That boy of mine has the dies in stock, 
just click on the die names to take you there.

Are you celebrating Halloween?

Take care friends - FDD tomorrow.

Wednesday, 28 October 2015

Quirky Trees and Winner!

Hello friends

I have been busy planning November's Charity Kit and then
I realised I hadn't posted the winning ticket for October's kit!

October's kit featured Stylized Trees - 
I love the fun quirky style of these.


A nice touch with this die set is that you can stencil through pretty snowflakes
on one of the trees, you can see them embossed in the photo above -
they look lovely embossed with white ink.


So....the winning ticket is....


Please take a look at your kit and if you have the winning ticket
dash off an email to me at creativity-continues@outlook.com
and I will send you a goodie box full of dies, stamps, adhesive and more!

Stylized Trees is available on the website here.

Take care friends - wishing you all a great Wednesday.

Tuesday, 27 October 2015

Catch up...

Hello friends

Catching up with things.
I returned home from my very busy demoing weekend firstly in Oldham
and then in Childer Thornton, Cheshire.

It does make me smile when I venture north, I love the difference
in our accents and sayings - I think I may adopt "fancy a brew"!

Glad you all liked the Feathers card.
Totally agree that finding designs for masculine cards is difficult.
The papers I used featuring the steam train are My Mind's Eye - Breeze.


It's a 6 x 6 paper stack and is available here.
I like My Mind's Eye as the papers are double sided and the images
in the 6 x 6 pads are smaller so perfect for card making.

I was looking in my diary and it's a year ago that I moved into my 
crafting cabin - goodness that time has just flown by.
I'm sort of wishing it looked this empty right now, it would mean I could have
a good sort out! 
 More items going in...
 The finished cabin.
 Have to say it isn't quite this tidy now!


Yes I think I definitely need to have a clean and sort out...
maybe in Spring!

Back soon with crafty projects - I'm making them but really must
photograph more!

Take care friends.

Sunday, 25 October 2015

Feathers!

Hello friends
 
I'm still on trend with feathers!
To make a change I've made a masculine card today,
I rarely do this as I'm totally hooked on pretty things!
 
A card using one of the new Contour steel rule die set
I've cut two from different card stock and using my Tool n' One added
some score marks.
Attached with a button and twine. Simples!
 
T
The stamped sentiment is one of my favourite well used sets -
Scripty Sayings by Lawn Fawn.

 
Delighted to say Elliott is going to be stocking Lawn Fawn
on the website - both stamps and papers. 
It's all on order and winging its way from Southern California.
There's also going to be Winter Scripty Sayings...can't wait!
 
 
Keep an eye on his blog for news of Lawn Fawn's arrival.
Take care friends.


Friday, 23 October 2015

Friday Die Day

Hello friends

 This week for Friday Die Day I'm featuring the new
Cinch and Go Flowers


The set comes with 6 die pieces (4 flowers are joined as one die)
and the approximate sizes are:

Flourish 1: 3.60 x 0.90 inches
Flourish 2: 3.85 x 1.20 inches
Calyx: 1.20 x 1.20 inches
Flower 1: 0.90 x 0.85 inches
Flower 2: 1.15 x 1.05 inches
Flower 3: 1.35 x 1.25 inches
Flower 4: 1.60 x 1.45 inches
Flower 5: 1.70 x 1.80 inches
Flower 6: 1.90 x 2.00 inches
This is how they look cut/embossed.
There are various methods to make the flowers, I chose to use a pretty beaded pin
as my flower centre and layer up the flowers through the hole in the middle.
Alternatively you could thread a bead onto wire or perhaps use a brad.


As I threaded each flower I put a fine line of glue between
and squeezed the petals up gently.


I've added one of each layer but you can of course add as many as you wish.

If you are making these for a vase then place the calyx on the reverse.


Also using this die to cut finer card/paper you can scrunch them to make
a more vintage look or perhaps spritz with mists.

For my project I've used one of the flourish pieces and placed the 
flower on a Square Petal Top Box.

Simple, effective and fun!
 

Cinch and Go Flowers are due in stock next week
(according to that boy of mine).

Take care friends - wishing you all a wonderful weekend. 

Thursday, 22 October 2015

Oh Christmas Tree...

Hello friends

Delighted you liked yesterday's mini tree featuring 
Bitty Blossoms.
I thought it might be nice to share with you a larger version
featuring Spiral Blossoms.
I made this a while ago, Anne remembers this as she attended the class :)

This one needs a full sheet of 12 x 12 to cover the cone
and takes approximately 70 flowers...
I think I probably watched a few films whilst rolling them!


I inserted a garden cane to affix my label message at the top and ribbon.

Some tips for both Spiral Blossoms and Bitty Blossoms that work for me:

Use good quality paper or thinner card, if you use thicker card spritz
lightly with water.

To begin rolling, I use the pokey tool end of my Tool n One -
wrap the first curls around that to create a nice circular roll
and I then continue with my fingers.
Rolling firmly but not too tight.
Once rolled I let go and let it find its own shape.
I then apply a liberal dob of glue onto the base and affix.
Put to one side to dry fully and then tweak (quite a lot!) afterwards.

My favourite size of Bitty Bossoms is the medium one and my favourite
Spiral Blossom is Spiral Blossoms Three - love those pointed petals. 

Of course these need not just be for Christmas, all done in ivory or white
for a wedding would be lovely.

Take care friends,  I'm back tomorrow.


Wednesday, 21 October 2015

Bitty Blossom Tree with Bow

Hello friends

Yes I know it's still October but I just can't help myself!
With the darker nights coming I need something cheerful so I'm
still on my festive theme.
Today's crafty offering is a mini tree featuring Bitty Blossoms,
Sprigs and Tiered Multiloop Bows.


The tree measures approx 20cm - just right for a table centrepiece,
your mantelpiece or desk at work maybe?
The base is a polystyrene cone - that boy of mine has them on
the website here.

I used a piece of paper measuring 7" x 7" to cover the cone.
The Bitty Blossoms were created with a few sheets of 12 x 12,
but you could equally use lots from your scrap box.
I made a total of 40 flowers, starting with 7 large flowers around the base
and then the remaining were all cut from the middle size.
The Sprigs were cut up, a dob of glue on the end and inserted into gaps.

Not the quickest of projects to make but therapeutic!
I chose to die cut all the flowers first and then sit in front of a film to
roll and glue them.

The bow is a new die, it's due in stock within the next few days,
Tiered Multiloop Bow - really easy to do and I shall be featuring this set
soon with a Friday Die Day.


Take care friends.

Tuesday, 20 October 2015

Festive Fancy Bow

Hello friends

A festive card that I created went live on the Scrapbook Adhesives blog yesterday,
it features a rather nifty technique with glittered embossing powder 
The dies featured are Fancy Bow and Pierced Rectangles.


All the step by step details and materials list can be found
on the Scrapbook Adhesives blog here, it would be lovely
if you could pop over, have a nose and perhaps leave a comment.


My week has started with a speedy craft session, I'm getting ready for
a busy weekend - demoing in both Oldham and Cheshire,
all the details are on the sidebar - just click on my Spellbinders on tour pic.

Take care friends - wishing you a great day!